
How to install cabinet handles and knobs
Fitting a handle takes about ten minutes per door, but most mistakes happen before the drill comes out: a misaligned hole, a screw that is too short, or a row…
By Shahid Iqbal & Co — — 6 min read
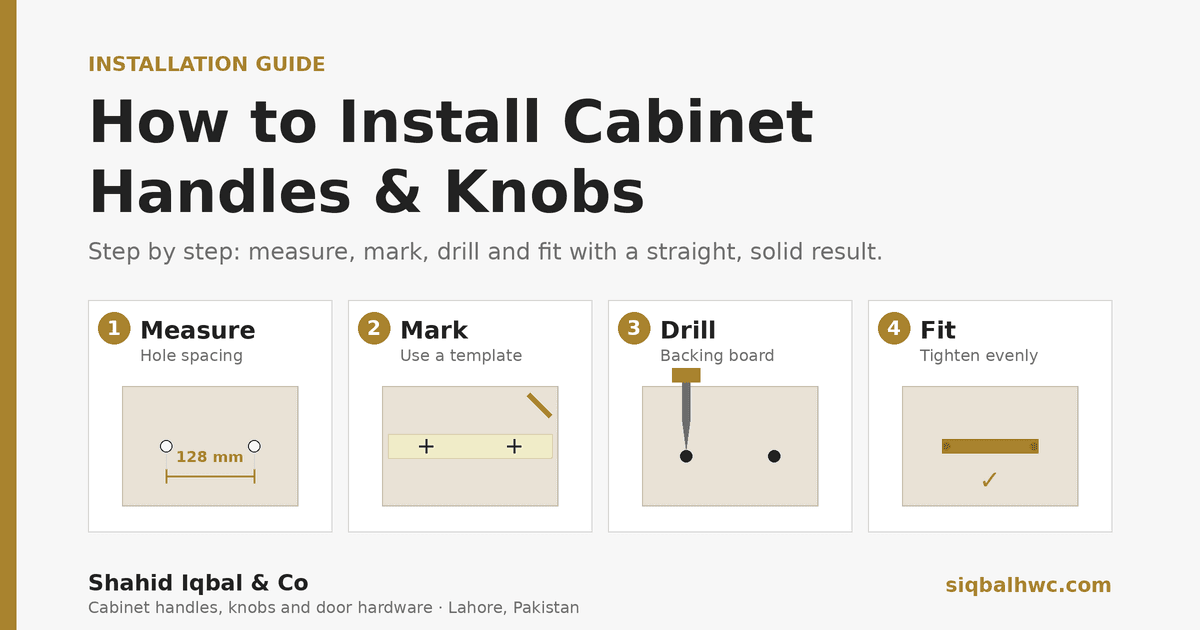
Fitting a handle takes about ten minutes per door, but most mistakes happen before the drill comes out: a misaligned hole, a screw that is too short, or a row of handles that sit at slightly different heights. This guide walks you through fitting cabinet handles and knobs step by step, so the result looks straight and feels solid.
What you need A tape measure or steel ruler, and a pencil Masking tape (it protects the finish and lets you mark without scratching) A drill with a bit that matches your screw size, usually 4mm to 5mm for standard handle screws A screwdriver (hand tightening gives the best control) A spare piece of wood or a scrap of cardboard for a drilling template The screws supplied with your handle, plus a few longer ones if your door is thick
Step 1: Confirm the fit before you drill Two measurements decide everything. For a two-hole handle, measure the hole spacing (centre to centre), and check that it matches the handle you bought. Our guide on how to measure cabinet handle hole spacing shows how to take it in two minutes. Common spacings include 96mm, 128mm and 192mm. If you have not chosen a length yet, the cabinet handle size guide explains what suits drawers, kitchen doors and wardrobes. Knobs are simpler: they use a single hole, so there is no spacing to match.
Step 2: Decide where the handle goes Consistency matters more than the exact position. Pick a rule and repeat it on every door and drawer. Wall cabinet doors: place the handle near the bottom corner on the side opposite the hinges, so it sits within easy reach. Base cabinet doors: place it near the top corner, opposite the hinges. Drawers: centre the handle horizontally and vertically on the drawer front. On deep drawers, some people use two knobs or two handles spaced evenly. Wardrobe doors: mount the handle at a comfortable hand height, roughly the middle of the door on the side opposite the hinges. A small distance from the door edge, often 50mm to 75mm, looks balanced on most cabinets. Measure once on the first door and use that number everywhere.
Step 3: Make a drilling template Marking every door by hand is how handles end up crooked. A template fixes this. Cut a piece of cardboard or thin wood about the size of a door corner. Mark your chosen distance from the edge and from the bottom or top. Mark the hole positions, using the exact hole spacing of your handle. Drill or punch small holes through the template at those points. Hold the template against each door and mark through it with a pencil. For drawers, a template with a centre line on it makes it easy to line up the holes on every drawer front in seconds.
Step 4: Mark and drill Put a strip of masking tape on the door where the holes will go. Mark the hole positions on the tape. Check the marks with a ruler once more. Measure twice, drill once. Place a piece of scrap wood behind the door where the drill will exit. This stops the back face from splintering. Drill straight and steady, at a moderate speed. A hole that is a touch larger than the screw lets you make tiny adjustments, but do not go much bigger or the handle will feel loose. Step 5: Choose the right screw length
The screw must be long enough to grip the handle, but not so long that it pokes through the front of the door. As a rule of thumb, the screw length equals the door or drawer thickness plus the height of the handle's threaded post, plus a few millimetres for the grip. If the screws in the pack are too short for a thick door, buy longer ones of the same thread. If they are too long, do not force them. A small washer or a shorter screw is the safer fix.
Step 6: Fit and tighten Push the screws through from the inside of the door towards the front. Line the handle up with the screw tips and turn each screw a few turns, keeping both loose at first. Once both screws have started, tighten them alternately, a little at a time. Stop when the handle is firm. Over-tightening can crack thin panels or strip the thread.
For a knob, fit the screw from the inside in the same way and turn the knob onto it until it is snug.
Step 7: Check and finish Open and close the door a few times and pull the handle firmly. Nothing should wobble. Look along a row of handles from the side. They should sit in a straight line. Wipe off pencil marks and fingerprints. For cleaning tips that suit each finish, see our care guide for brass, matte black and chrome handles. Re-check the screws after a few weeks. Wood can settle slightly, and a quarter turn keeps everything tight. Common problems and quick fixes Problem Likely cause Fix Handle is loose Screws too short, or hole drilled too big Use a longer screw or add a small washer Handle sits crooked Holes marked by eye Use a template for every door Screw pokes through the front Screw too long Swap for a shorter screw of the same thread Wood splinters at the back No backing while drilling Clamp a scrap board behind the door New handle does not match old holes Different hole spacing Choose a handle with the same spacing, or fill and redrill Replacing old handles If you are swapping handles rather than fitting new ones, the easiest path is to buy a new handle with the same hole spacing as the old one. The existing holes are then reused with no drilling at all. Measure the old handle's hole spacing first, then browse cabinet handles that match. For a main entrance, check door thickness and lock type before choosing, as covered in our main door handle guide.
Not sure which size or finish will suit your cabinets? Send us a photo and your measurements on WhatsApp at +92 311 7798157 and we will help you choose.
Frequently asked questions Do I need special tools to fit a cabinet handle?
No. A ruler, pencil, drill and screwdriver are enough. Masking tape and a simple cardboard template make the job cleaner and faster, especially if you are fitting several handles.
What size drill bit should I use for cabinet handle screws?
Most handle screws are a standard size that needs a bit of about 4mm to 5mm. Check the screw diameter in the pack and pick a bit that is the same size or very slightly larger, so the screw passes through without forcing.
How do I keep all my handles at the same height?
Make a template and use it on every door and drawer. Measure the position once, copy it onto cardboard or wood, and mark each door through the template instead of measuring again.
What if my new handle does not fit the old holes?
Choose a handle with the same hole spacing as the old one, which avoids drilling entirely. If you prefer a different spacing, fill the old holes with wood filler, sand and touch up the surface before drilling new ones.
Are the screws included with the handle always the right length?
They fit standard door and drawer thicknesses. Thicker doors may need longer screws of the same thread, so measure the door thickness before you start.
Ready to choose?
Every product page lists the exact size, finish and hole spacing. Not sure what fits? Send us your measurements on WhatsApp at +92 311 7798157 and we will help you pick.
More guides

Cabinet Handles Price in Pakistan: What Determines the Cost?
Cabinet Handles Price in Pakistan: What Determines the Cost? If you are searching for cabinet handles price in Pakistan, you will quickly notice that prices…
4 October 2026 — 7 min read
Brass Cabinet Handles and Knobs in Pakistan | Siqbal Hardware
Brass Cabinet Handles and Knobs: Add Warmth and Style to Your Furniture When it comes to furniture and interior design, small details can make a big…
3 October 2026 — 6 min read

Wardrobe Handles: Choosing the Right Fit
How to choose wardrobe handles that look right and feel good every day: style, length, material, finish and where to place them on large doors.
1 October 2026 — 4 min read